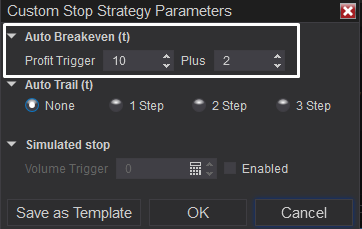
In practical trading, automatically moving your stop-loss is a vital risk management strategy that helps protect profits when the market moves in your favor. On NinjaTrader 8, you can automate stop movement using two main methods:
Using Auto Breakeven & Auto Trail in ATM Strategies.
Attaching your stop/target to an indicator plot (e.g., moving averages, trailing stop…).
Top Indicators/Systems That Help You Trade and Manage Orders Effectively
ThunderZilla – Momentum-Based Trade & Exit Management
Zephyrus Force – Price Action & Momentum Trailing Stop - Support/Resistance
PANA Kanal – ATR Trailing Stop - Market Structrle
Solar Wave / Solar Wave RK – Trailing Stop base On ninZaATR - Smoother, Trend Following
1. Auto Stop Management via Auto Breakeven & Auto Trail
Auto Breakeven – Move Stop to Entry Automatically
Example: You enter a Buy at 1000. You set:

Auto Trail – Move Stop in Steps as Price Advances
This feature works like a trailing stop, but instead of moving the stop continuously, it does so in defined "steps" for better control.
| Field | Meaning |
|---|
| Stop Loss | Distance from entry where the stop will be moved |
| Profit Trigger | Amount of profit (in ticks) required to activate the step |
| Frequency | How often (in ticks) the stop should trail once triggered |
There are 3 options:
1-Step Trail – Single Adjustment Only
The simplest setup: your Stop Loss will adjust once when a certain profit level is reached, and then it stays there.
Example:
Stop Loss: 30 ticks
Profit Trigger: 10 ticks
Frequency: 5
▶️ Once your trade reaches 10 ticks of profit, the trailing logic activates.
▶️ For every 5 ticks the price moves further, the Stop Loss follows — maintaining a 30-tick gap behind the market.

2-Step Trail – Two-Stage Profit Protection
Stop Loss: 20 ticks
Profit Trigger: 55 ticks
Frequency: 3
▶️ When your profit reaches +55 ticks, the Stop tightens to just 20 ticks behind entry.
▶️ This starts securing a meaningful portion of your unrealized gain.
▶️ The Stop will trail forward every 3 ticks, staying responsive to trend continuation.

3- Step – Aggressive Lock-In of Profits
- Stop Loss: 10 ticks
- Profit Trigger: 75 ticks
- Frequency: 1
▶️ At +75 ticks profit, your Stop is now just 10 ticks behind entry.
▶️ From this point, the Stop moves forward with every single tick in your favor.
▶️ Goal: maximize and lock in profits during strong market moves - no hesitation, no regrets.
Why Each Auto Trail Step Needs a Different Profit Trigger & Stop Loss
When using Auto Trail in NinjaTrader 8, one of the biggest mistakes traders make is setting all three steps with the same values.
In reality, each Step should reflect a different phase of the trade - and therefore must have its own logic, own Profit Trigger, and own Stop Loss.
Each Step Represents a Different Stage of the Trade
| Step | Trade Phase | Purpose |
|---|
| Step 1 | Initial movement | Let the trade breathe, avoid early stop-outs |
| Step 2 | In profit | Begin protecting moderate gains |
| Step 3 | Extended profit | Lock in large profits before reversal risk increases |
Higher Profit Trigger = Wait for price to prove itself
In Step 1, the market is just starting to move in your favor → you need a larger buffer before trailing begins.
In Step 2, you’ve captured a decent move → it’s time to tighten the Stop to secure profits.
In Step 3, you're up big → trailing should be tight and responsive to preserve gains tick-by-tick.
That’s why:
Stop Loss Should Get Tighter With Each Step
| Step | Suggested Stop Loss | Reason |
|---|
| Step 1 | 30 ticks | Wide enough to avoid noise or minor pullbacks |
| Step 2 | 20 ticks | Tighten to lock in partial profits |
| Step 3 | 10 ticks | Very tight — prevent giving back large gains |
The Power of Auto Trail Lies in Its Step-by-Step Flexibility
Auto Trail is more advanced than basic trailing stop because:
It lets you manage trades based on market behavior and stage, not just a fixed tick distance.
So if you assign the same values to all steps, you’re missing out on the full potential of Auto Trail.
2. Automatically move your Stop Loss based on a trailing indicator (such as SMA, EMA, Trailing Stoop, etc.) using the "Attach to Indicator".
Step-by-step Guide:
Step 1: Open Chart and Place an Order
Open a Chart window in NT8.
Place a Buy or Sell order as usual using Chart Trader.
Add a Stop Loss if it wasn’t already set.
Step 2: Attach the Stop to an Indicator (Trailing Stop)
Right-click on the Stop Loss order on the chart.
Select "Attach to Indicator" from the menu.
A dialog box will appear:
Indicator: Choose the indicator you want to use as your trailing reference (e.g., EMA(21) or SMA(50)).
Plot: Select the specific plot (usually EMA if you're using an EMA).
Offset (optional): Enter the distance between the indicator and the stop (e.g., 10 ticks below the EMA).
Click OK.
📝 Note: Your Stop Loss will now automatically follow the indicator. As the EMA or chosen indicator updates, your SL will move accordingly.
Step 3: Monitor the Position
You’ll see the Stop Loss line linked to the indicator with a small arrow and dashed line.
Hover your mouse over the SL to view its attachment details.
See detail video how to set up: