If you’ve ever used Parabolic SAR Pro – one of the most popular indicators from ninZa.co – you probably agree that while it’s highly intuitive, it can also be extremely noisy, especially on lower timeframes like M1.
In this post, I’ll show you a simple but powerful way to filter out the noise, allowing you to unlock the full potential of Parabolic SAR Pro - preserving its quick-reversal nature while minimizing false signals.
1. What is Parabolic SAR Pro?
Parabolic SAR (Stop And Reverse) is a classic trend-following indicator designed to help traders identify trend reversals and time exits effectively. The “Pro” version on ninZa.co is a significantly enhanced and visually optimized edition, built for NinjaTrader users.
Here’s how it works:
When dots appear below the price, it signals a bullish trend.
When the dots shift above the price, it signals a bearish trend.
While it works beautifully in trending markets, its biggest drawback is its sensitivity - on small timeframes like 1-minute charts, Parabolic SAR Pro can flip signals too frequently, making it hard to trade with confidence.
Here’s what Parabolic SAR Pro looks like without any filtering

As you can see, it reacts to every small price swing, creating a messy and confusing chart. This is where many traders give up on it.
Now, here’s what it looks like after filtering

The difference is night and day - a much cleaner, more stable indicator that aligns with actual market direction.
2. So how do we achieve this?
Simple: Use a higher timeframe as a trend filter for your lower timeframe signals.
You’ll still trade using PSAR Pro on your entry timeframe (e.g., M1), but you’ll feed it with data from a higher timeframe (e.g., M10, M15). This ensures that signals only appear when they align with the larger trend, reducing noise and false reversals.
3. Step-by-step: Multi-Timeframe Filtering for Parabolic SAR Pro
Step 1:
Add a higher timeframe to your current chart.
→ Example: If you're trading on 1-minute, add a 10-minute or 15-minute timeframe.
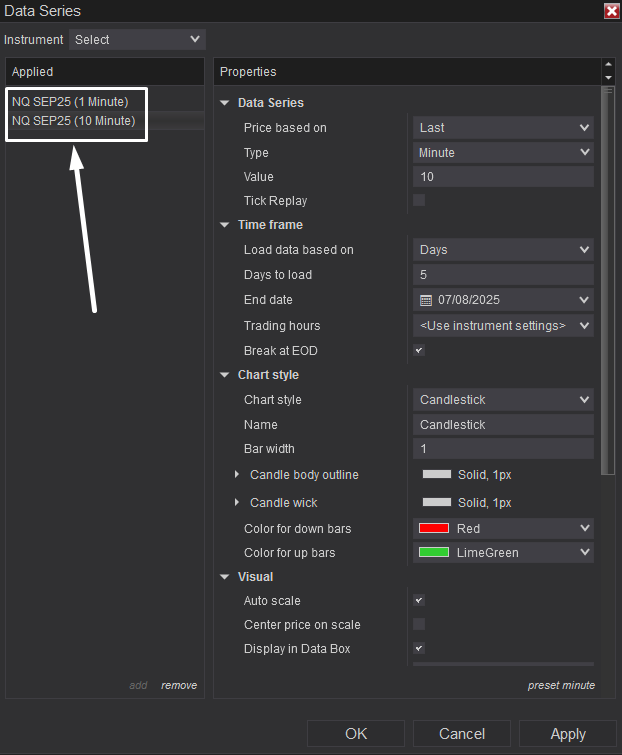
Step 2:
Hide the higher timeframe candles to avoid clutter.

Step 3:
Open the Inputs section of the PSAR Pro indicator.
→ In the Input Series field, instead of using the default (e.g., “Close of M1”), choose the Close of the M10 series you just added.


Step 4:
Display PSAR Pro in Panel 1

Step 5:
Enjoy the results!
→ You now have a filtered, trend-aligned version of Parabolic SAR Pro that’s far less noisy and much more tradeable.


6. Final Thoughts
Not all noisy indicators are useless - sometimes all it takes is a simple technique like Multi-Timeframe filtering to turn an overly sensitive indicator into a powerful, trend-confirming tool.
I hope this helps you make better use of Parabolic SAR Pro. If you found this useful, feel free to share it with the community!
Happy trading and stay consistent!